During this process of selecting a part or a library, for PCB and not simulation always add the discrete library. This has the most common parts. After OrCad project has been completed, when you open the place a part menu or 'p' on the keyboard, you can type a part number or a part type like zener, it will search all libraries and tell you which one it is (library) add the library, select the part and place it. If you create custom schematic images or modify one in the library, add them to a new library, updates can over write standard libraries and your custom will be lost. You will have to go to a schematic that used the part and recover it from there.
AEi Power IC Model Library. In the OrCAD Capture CIS datasheet. Download Datasheet. OrCAD Capture Cloud With 14-Million-Part Ultra Librarian Database.
Having the same problem I built this OrCAD to EXCEL part list. Here is a link to my GitHub I propose a CaptureEXCELcomplete.zip file.
In that zip file you will find all OrCAD Capture libraries in an EXCEL format. Each Capture library content is there in it's corresponding EXCEL file.
All files are presented in Folder Sub-Folder arrangement identical as the one present in the Capture libraries installation folder. To quickly find where a part may be in a library all you have to do is UnZip the file on your local drive (make sure that particular folder in within Windows Indexing location) and then open Windows Explorer, navigate to where you unzipped the file and use the Windows Explorer Search feature. With each character you enter in the search field you will see exactly in which library you can find that search string.
Furthermore, you can use those EXCEL files to build a MS ACCESS database for other uses. Pointers in c by yashwant kanetkar ebook login. Hope this help Cheers.
How to include our free library content in your OrCAD/Allegro Libraries. Library Loader V2.36 or earlier 1 – Click Settings in Library Loader. 2 – Select the appropriate version 3 – To prevent these instructions from showing every time you download a part, please uncheck “Show Library Import Instructions”. If you want to review these at any point, you can click the Help link in the same dialog.
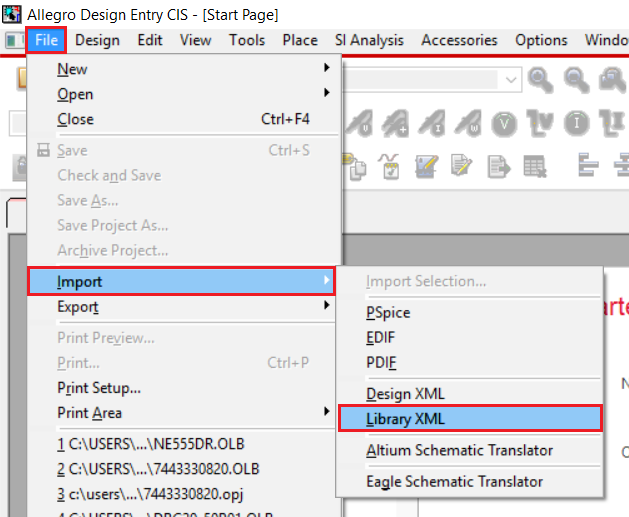
4 – Click OK to accept the Settings OrCAD Capture 1 – Select Import->EDIF from the File menu. 2 – Click Browse to Open the the *.edf file from your Downloads Folder. If the “Configuration file” is not preset to the EDI2CAP.CFG from the OrCAD installation directory, you will also find this file in your Downloads Folder. Then click OK. 3 – Click OK to accept the warnings. 4 – Select Open->Library from the File menu. 5 – Select the the *.olb file from your Downloads Folder and click Open.
6 – Double-click the symbol name (Manufacturer Part Number) to preview the Symbol. Allegro PCB IMPORTANT! – You must ensure that your Downloads Folder is included in the Library padpath: 1 – Select “User Preferences.” from the Setup menu in the PCB Editor. Click the Browse () button against padpath under the Paths->Library Category. 2 – Click the “New (Insert)” icon and then click “” to browse to your Downloads Folder. Then click OK.
PAL: ------------------------------------------------------------------------------- // // // // _|_ _ / /_ _ _ // // // // // // // // // // // // // (_||_)(_|/ / _||_|| // // // // // // // // // // ------------------------_|------_||_||_|--v1.0.6-------[Checking for updates to abgx360.dat. Gta iv xbox 360.
Start here if padpath includes your Downloads Folder. 1 – Double-click the BuildFootprint.bat file from your Downloads Folder. 2- If the downloaded component has D-shaped pads, the d-shape.scr script will run first to generate the d-shape drawing. Once this has finished, select “Zoom Fit” from the View menu to preview. Then click the cross (X) in the top right corner or select “Exit” from the File menu to close the editor. 3 – The scripts will continue to run to generate the required padstacks and then use these to build the footprint. Once this has finished, select “Zoom Fit” from the View menu to preview.
Then click the cross (X) in the top right corner or select “Exit” from the File menu to close the editor. Click Yes to save changes. 4 – Click the cross (X) in the top right corner of the command prompt.
5 – Done OrCAD/Allegro 17.2 or later with 1. Click Settings in Library Loader 2. Select “Allegro 17 or later” from the Version drop-down. Then set the paths by clicking the browse buttons for the padpath (folder containing the padstack (*.pad) files, psmpath (folder containing the package symbol (*.psm) and package drawing (*.dra) files, and steppath (folder containing the 3D STEP (*.stp) files. Note: These paths can be determined by reviewing them in the Allegro User Preferences Editor (“User Preferences.” from the Setup menu in the PCB Editor) 3. To prevent these instructions from showing every time you download a part, please uncheck “Show Library Import Instructions”.